Setting up WooCommerce product variations swatches is essential for any eCommerce store that sells products with multiple options, such as colors, sizes, or styles. This feature allows customers to choose their preferred product variations in a visually appealing manner, enhancing their shopping experience. By utilizing advanced swatches, you can make your product pages more attractive and user-friendly.
In this comprehensive guide, we will walk you through the process of setting up WooCommerce variation swatches using plugins like Extendons. We will cover everything from the basics of product variations to advanced customization techniques. Let’s dive in!
Understanding WooCommerce Product Variations
Before we delve into the specifics of setting up WooCommerce product variations swatches, it’s essential to understand what product variations are and how they function within WooCommerce.
What Are Product Variations?
Product variations in WooCommerce refer to different versions of a single product that differ in attributes, such as:
- Color: A t-shirt available in red, blue, and green.
- Size: A jacket available in small, medium, and large.
- Material: A chair available in leather and fabric.
Each variation can have its own SKU, price, stock level, and other unique details, allowing you to manage inventory effectively while providing customers with a range of choices.
The Importance of Using Swatches
Using swatches for product variations enhances the visual appeal of your product pages. Instead of displaying attributes as text or dropdown menus, swatches allow customers to see their options at a glance. For example, color swatches can be represented by colored circles, while size options can be displayed as buttons. This visual representation can significantly improve user engagement and drive conversions.
Setting Up WooCommerce Product Variations Swatches
Now that we understand the basics, let’s go through the step-by-step process of setting up WooCommerce variation swatches using the Extendons plugin.
Step 1: Install and Activate the Extendons Plugin
The first step is to install the Extendons plugin, which offers advanced swatches for product variations. Here’s how to do it:
- Login to Your WordPress Dashboard: Go to your website’s admin area.
- Navigate to Plugins > Add New: In the left sidebar, click on “Plugins,” then “Add New.”
- Search for Extendons: In the search bar, type “Extendons WooCommerce Product Variations Swatches.”
- Install and Activate: Once you find the plugin, click “Install Now,” and after installation, click “Activate.”
- Verify Installation: Check if the plugin is listed under the Plugins section and ensure it’s activated.
Step 2: Configuring Global Attributes
Before adding variations to specific products, you need to set up global attributes. Global attributes are reusable across multiple products and can include options like colors, sizes, or materials.
Creating Global Attributes
- Go to Products > Attributes: In your WordPress dashboard, navigate to “Products,” then click on “Attributes.”
- Add New Attribute: Fill in the fields to create a new attribute. For example, if you want to create a color attribute, you can name it “Color” and add terms like “Red,” “Blue,” and “Green.”
- Configure Terms: After adding the attribute, click on “Configure terms” to add specific values. Here, you can input the colors you want to offer.
- Repeat as Necessary: Repeat the process to create additional attributes, such as size or material.
Step 3: Adding Product Variations
With your global attributes set up, you can now add variations to individual products. Here’s how:
- Go to Products > Add New: To create a new product, navigate to the “Products” section and click on “Add New.”
- Select Product Type: Scroll down to the “Product Data” section and select “Variable product” from the dropdown menu.
- Add Attributes to the Product: Click on the “Attributes” tab within the product data section. Here, select the global attributes you created earlier and add them to the product.
- Enable Used for Variations: Make sure to check the box next to “Used for variations” for each attribute you want to include.
- Save Attributes: After adding the attributes, click the “Save attributes” button.
Step 4: Creating Variations
Now that your attributes are set up, you can create variations based on those attributes.
- Navigate to the Variations Tab: Click on the “Variations” tab within the product data section.
- Add Variation: From the dropdown menu, select “Create variations from all attributes” and click “Go.” This will automatically generate all possible variations based on your attributes.
- Edit Variations: You will see a list of all the variations created. Click on each variation to set specific details such as price, SKU, stock status, and images. This customization allows you to tailor each variation to your specifications.
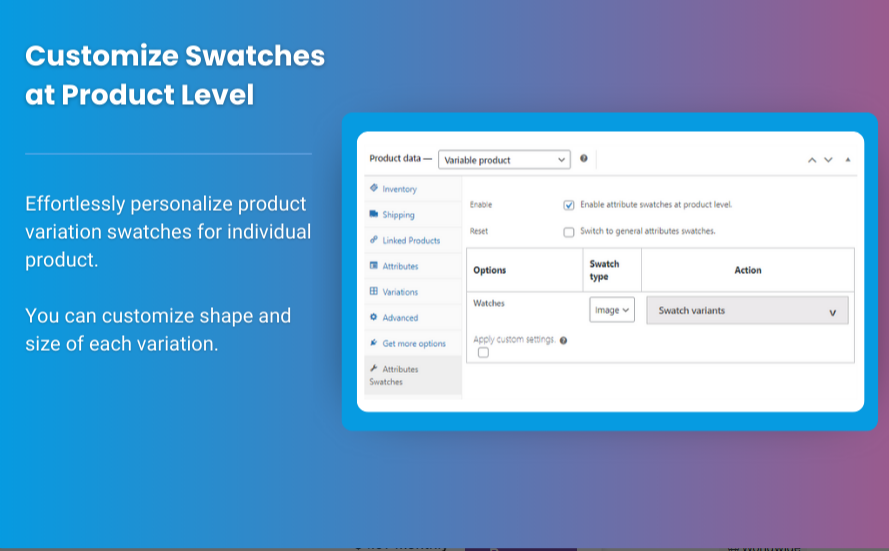
- Enable Swatches: If you’re using the Extendons plugin, you will have options to set swatches for each variation. Choose the visual representation for color variations (e.g., a colored circle) or size variations (e.g., a button).
- Save Changes: Once you’ve added the necessary details and configurations, click “Save changes.”
Step 5: Configuring Swatch Options
To make your WooCommerce product variations swatches visually appealing, configure the swatch options in the Extendons plugin.
- Go to Extendons Settings: In your WordPress dashboard, navigate to Extendons > Settings.
- Swatch Appearance: Here, you can customize how the swatches will look on your product pages. Adjust settings like size, shape, and spacing to match your store’s design.
- Select Swatch Types: Choose the swatch types for each attribute. For color attributes, you can select colored circles or squares, while for size, you might prefer buttons or dropdowns.
- Save Your Settings: After customizing the swatch appearance, make sure to save your settings.
Step 6: Previewing Your Product Page
Now that you’ve set up WooCommerce variation swatches, it’s time to see how it looks on the front end of your store.
- Visit Your Product Page: Navigate to the product page where you’ve set up variations.
- Check Swatch Functionality: Ensure that the swatches display correctly and that customers can easily select their desired variations.
- Test User Experience: Try selecting different variations to see if the product details update accurately and smoothly. This includes checking for changes in price, images, and stock status.
Step 7: Optimize for Mobile Devices
With the increasing use of mobile devices for online shopping, optimizing your product variations for mobile is crucial.
- Responsive Design: Ensure that the swatches and product variations are responsive and easily accessible on mobile devices.
- Test Across Devices: Use various mobile devices to test how your product pages appear. Check that the swatches are easy to click and that the user experience remains smooth.
- Optimize Loading Speed: Ensure that images and other elements load quickly on mobile devices to prevent user frustration.
Best Practices for Using WooCommerce Product Variations Swatches
Now that you have your WooCommerce variation swatches set up, here are some best practices to keep in mind to enhance their effectiveness:
1. Use High-Quality Images
When displaying variations, use high-quality images to give customers a clear view of what they’re selecting. This is particularly important for products with intricate details or varying colors.
2. Limit the Number of Variations
While offering numerous variations can be beneficial, having too many options may overwhelm customers. Limit variations to the most popular or relevant attributes to keep the shopping experience streamlined.
3. Offer Clear Descriptions
Provide clear descriptions for each variation, especially if they differ significantly in terms of features or functionality. This helps customers make informed decisions.
4. Use Tooltips or Hover Effects
Incorporating tooltips or hover effects can provide additional information about a specific variation when a user hovers over a swatch. This can improve user engagement and understanding.
5. Monitor Customer Feedback
Pay attention to customer feedback regarding product variations. This can provide insights into which attributes are popular and whether any adjustments are necessary.
Also, check out the useful insight about the woocommerce mini cart plugin to enhance your store’s shopping experience!
FAQs
1. What are WooCommerce product variations swatches?
WooCommerce product variations swatches are visual representations of product attributes (like color and size) that allow customers to select their preferred variations easily.
2. How do I add variation swatches in WooCommerce?
To add variation swatches in WooCommerce, install a plugin like Extendons, create global attributes, and then assign those attributes to your products. Finally, configure the swatch settings.
3. Can I customize the appearance of variation swatches?
Yes, using a plugin like Extendons, you can customize the appearance of variation swatches, including colors, shapes, and sizes to match your store’s branding.
4. Are variation swatches mobile-friendly?
Yes, if set up correctly, WooCommerce variation swatches can be made mobile-friendly, ensuring a smooth shopping experience on all devices.
5. Can I use multiple attributes for variations?
Absolutely! You can create multiple attributes (like color and size) for a single product, allowing for comprehensive product variations.
6. How can I improve the user experience with variation swatches?
To enhance user experience, use high-quality images, limit the number of variations, offer clear descriptions, and consider using tooltips or hover effects for additional information.
Conclusion
Setting up WooCommerce product variations swatches using a plugin like Extendons can significantly enhance your online store’s user experience. By providing a visually appealing and intuitive way for customers to choose their desired product options, you can boost engagement, reduce cart abandonment, and ultimately increase conversions.
By following the steps outlined in this guide and implementing best practices, you’ll create a user-friendly shopping experience that encourages customers to explore your products and make purchases with confidence. Happy selling!


